Organising your pots and pans can be a relatively easy task when you consider how you use them. They can be an annoying item to store in a functional way, especially if you don’t have a drawer. They are large and bulky and most people usually have quite a few. Especially if your like me and purchased a complete set when you moved out of home, but only use a portion of them.
When we started planning our move to our tiny house I knew I needed to think about storage. Our house is only 9 squares, and although our kitchen is a reasonable size, it is still quite small. I have tried to maximise space in as many areas of the home as possible. As my last kitchen was twice the size, I have had to be a bit cleaver with idea to minimise the items we need along with maximising the use of the space we have.
Trying different layouts
After trying a few different layouts in the cupboard I was not happy with the functionality. Functionally is important as it not only makes things easier to use but it also encourages you to put items back in their correct space. If an item is hard to put in its home it often doesn’t which is what helps create mess and clutter.
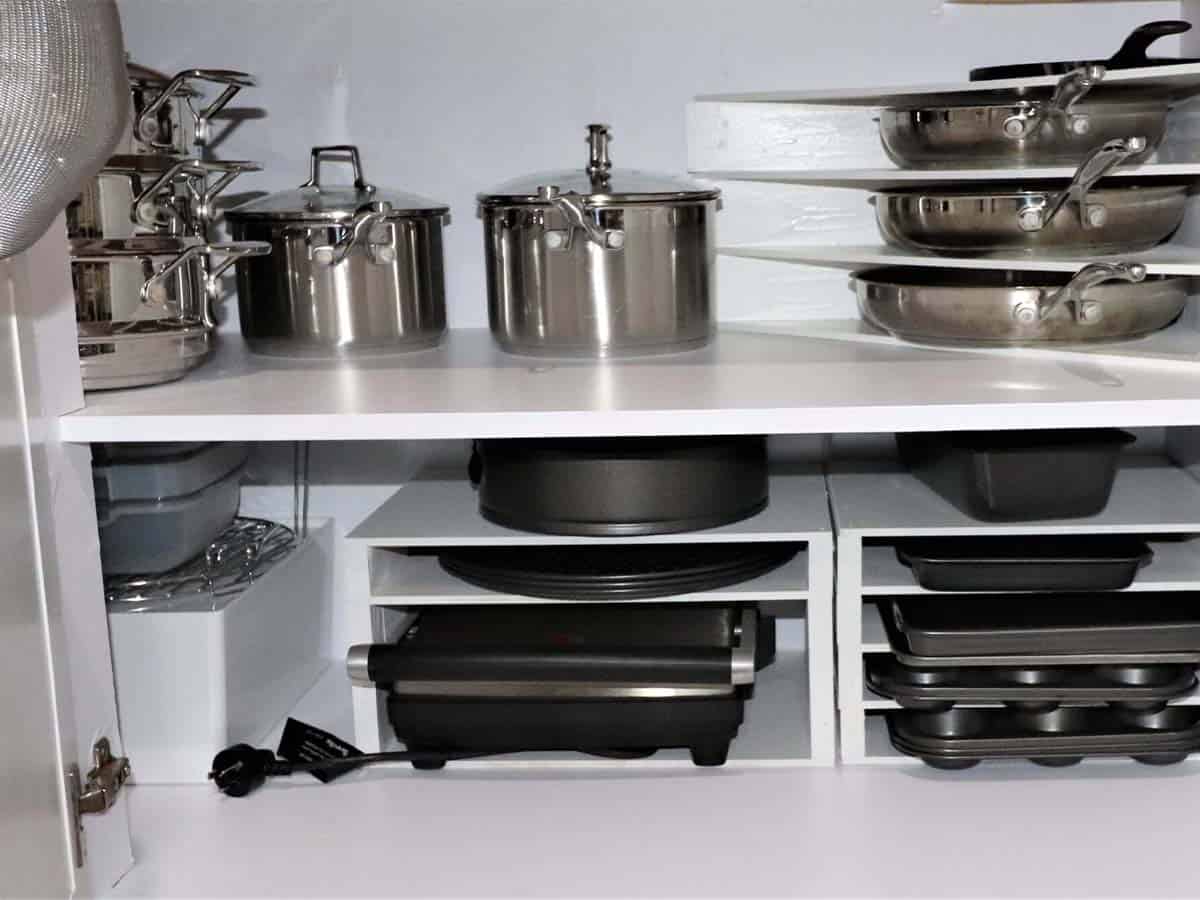
The cupboard I use for pots and pans is a blind cupboard. This means that a portion of the cupboard is not accessible directly by a door, you instead need to reach a bit. As I need the storage this area offers, I have put items in that portion that are not used too often such as cake baking tins and the extra saucepans and pots that came with my set.

Building the Cubbies
I decided that I creating some vertical cubbies would take advantage of the height and allow me to fix more into the easy to reach space.
I made cubbies for both shelves as I realised it would work well for my baking trays as well.
I made these very easily with MDF and pine from Bunnings.
I used pine in the height that would suit the items so that I didn’t need to make more than one cut. I don’t like to use a saw so designed them with this in mind.
Fry Pans
I found that the 42mm pine was a great height for most of my baking trays and 70mm worked well for my fry pans. For the sandwich press I needed more height so I attached 2 of the 42mm pieces together to make it tall enough.
The MDF was cut into triangles for the fry pans. I measured the base of the pan and made sure that the majority would be supported so that they were not unbalanced.

Baking Trays
I did the same for the baking tray storage but found that rectangles worked better in that area. This was for two reasons. The first is that the baking trays are longer, so needed more support. The second is that I had more available space so I was able to utilise that.
I used a small nail gun to attach the pieces together. Some areas I could not get to with this so I used liquid nails. As I wanted them to be easy to clean, as well as being practical and looking nice, I gave them a coat of paint, with paint left over from renovating the kitchen cabinets.

I also added a couple of hooks to the door to hang out strainers. These can be annoying to store as they are a bit bulky so hanging them here is a great use of space.
They have been working really well. My cupboard is much neater and more organised. It has made accessed my cooking items much easier and has also made it possible for my kids to be able to feel more independent and helpful in the kitchen.